Learning Objectives - In this class, you will learn how to use the Optimizer to automatically adjust and rebalance territories based on your selected balance criteria.
Resources - For the exercise based on this class we will use the below datasets
- North East ZIPs- A sample territory alignment file based on US ZIPs.
- North East Accounts -A sample accounts dataset used for balancing
Optimizer Interface
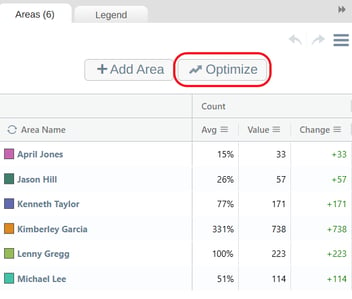
You can access the Optimizer from two places in eSpatial. The first is at the top of the Territory panel, above your balance metrics.
You can also access it through the hamburger menu in the top‑right corner of the Territory panel.
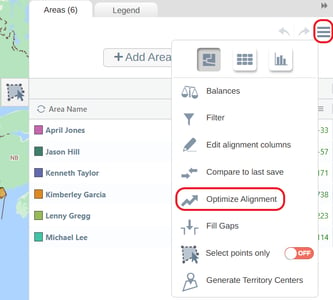
Both options open the same Optimizer interface, where you can choose the settings for your optimization which are explained below.
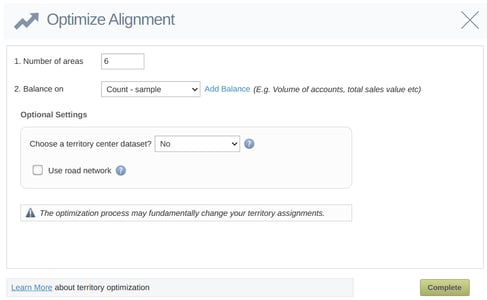
Number of Areas
This setting allows you to specify how many territory areas you want the Optimizer to create. The number can be the same, higher, or lower than the number of areas in your current alignment, depending on what you want to achieve.
Balance Metric
This is the metric the Optimizer will use when determining how to redistribute areas. It defaults to the most recently added balance metric, but you can select a different one from the dropdown.
If the balance you need is not listed, select Add Balance beside the dropdown to create it. Once added, it will appear in the list of available metrics.
Optional: Territory Centers
If you have a dataset that represents the central points of your territories, such as office locations or reps’ home addresses, you can select it here. When used, the Optimizer will build territories around these center points. This is useful when each territory must be anchored to a specific starting location.
Optional: Road Network
This setting uses drive time instead of straight‑line distance when creating territories. When enabled, the Optimizer ensures that areas grouped together are realistically connected by road, helping avoid situations where areas look close on the map but require long travel times.
Note: Using the Road Network may increase processing time. This option also cannot be used at the same time as a Territory Centre dataset.
Optimize Existing Territories
This option is helpful when your goal is to make your existing territories more evenly balanced without changing the number of territories. To optimize your current territory alignment leave Step 1: Number of Areas unchanged. This ensures the Optimizer maintains the same number of territory areas and focuses only on redistributing the existing ones based on your selected balance metric. After optimizing, you’ll still have the same number of territories, but the areas assigned to each territory may change as a result of the optimization.
Optimize to Dissolve or Consolidate Territories
This option is helpful when you want to move to a smaller set of territories to match new goals or structural changes. To consolidate or dissolve territories, change Step 1: Number of Areas to a number lower than the number of territories in your current alignment. This directs the Optimizer to generate the smaller set of territories you’ve chosen and rebalance your existing territories across them according to your selected metric.
After optimizing, you’ll see that the total number of territories has been reduced, and the remaining territories have been rebalanced. For example, if you began with six territories and changed the number to three, the Optimizer will produce three new territories with boundaries adjusted to create balanced areas.
.gif?width=670&height=320&name=NEWOptimizeConsolidateannotations-ezgif.com-crop%20(1).gif)
Optimize to Expand Territories
This option is useful when you want to increase the number of territories and adjust your alignment to reflect that change. To expand your territories, change Step 1: Number of Areas to a number greater than the number of existing territories in your current alignment. This directs the Optimizer to create the larger set of territories you’ve specified and redistribute your existing areas across them according to your selected metric.
After optimizing, you’ll see that the total number of territories has increased, and the areas have been reassigned to form the new alignment. For example, if you began with six territories and changed the number to eight, the Optimizer will produce eight territories with the areas redistributed to create a balanced structure.
Practical Exercise: Optimize Your Territory Alignment
Objective - Learn how to use the Optimizer tool to create balanced territories based on different scenarios.
1. Open the Optimizer
Access the Optimizer from either:
- The Territory Panel, above your balance metrics, or
- The Hamburger Menu in the top‑right corner of the panel.
2. Run a Basic Optimization
- Keep Step 1: Number of Areas the same as your current alignment.
- Select a balance metric (for example, Count).
- Run the optimization.
- Observe how the area assignments change to produce a more balanced structure.
3. Scenario Challenge
Try each of the following scenarios to see how the Optimizer handles different alignment goals:
Consolidate
- Reduce the number of territories by half.
- Run the optimization.
- Note how the Optimizer creates fewer territories and redistributes areas to maintain balance.
Expand
- Increase the number of territories by two.
- Run the optimization.
- Observe how the Optimizer generates additional territories and reallocates areas accordingly.
4. Compare Results
Review the outputs from each scenario to understand how different inputs affect territory alignment. Consider how balance, shape, and structure change between the original, consolidated, and expanded versions.