Learning Objectives – Gain a complete understanding of the different sharing methods and how to use each one.
Sharing Maps
Maps can be shared publicly or within your team. All map sharing can be done from the control panel.
Sharing Maps Publicly
To share a map publicly, first click on the Share button to open the Share Map window.
%20Share%20button.png?width=250&height=288&name=(Class%204)%20Share%20button.png)
Click on Shared Publicly to set the map to be shared publicly. This will make it visible to anyone with the public link. You can also click on the Hide from search engines option to make your map unsearchable, and choose to include a table of your data with your shared map by clicking the Include table option. Including the table option allows those accessing the map to filter and view the data. Please note that even if you do choose to “Hide from search engines”, the map is still publicly available so it can still be accessed by anyone on the internet. You can then click the Done button to generate your map links. The link can be shared with colleagues or embedded on a website or blog article.
%20Shared%20Publicly.png?width=500&height=220&name=(Class%204)%20Shared%20Publicly.png)
Sharing Maps Within your team
The Shared within team option allows you to share your maps securely with other members of your team so that you can collaborate on maps. Any map shared within team will appear in the library of the members of the Groups or Users that it has been shared with.
To share a map within your team, first click on the Share button to open the Share Map window. Then, choose Shared within team to set the map to be shared with other users on your account.
%20Share%20Map%20Menu-1.png?width=500&height=480&name=(Class%204)%20Share%20Map%20Menu-1.png)
Here you can type the name of the Group or the email of the individual user you want to share with into the text box. You can also give the group or user the following permissions as needed:
- Can edit map– the group or user can edit the map specified.
- Can edit data– the group or user can edit the data on the map specified.
Checking the Email notify check box will send an email to the members of the groups or the users you have shared the map with. This will notify them that you have shared a map with them, and they can find it in their Library. They will also get a notification within eSpatial, at the bell icon in the top right corner of the screen. Once finished sharing, click the done button to return to your map.
%20Shared%20within%20team.png?width=500&height=183&name=(Class%204)%20Shared%20within%20team.png)
It is important to note that you can share a map publicly or within team, but not both.
Sharing Workspaces
Sharing workspaces can be done from within the eSpatial Library. Select the Share icon beside the workspace name to share it.
%20Share%20in%20Workspace.png?width=688&height=125&name=(Class%204)%20Share%20in%20Workspace.png)
You can then select the users or groups you want to share your workspace with, and assign edit permissions the same way as you would with sharing a map. When sharing a workspace, you can also give the user permission to create additional maps within the workspace.
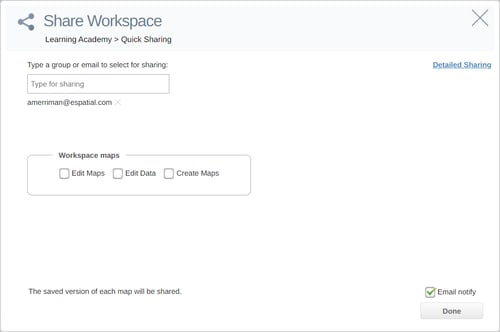
The Detailed Sharing section allows you to specify which maps within the workspace should be shared with which users along with what permissions they have over these maps.

If you want to work on a single view with your colleagues, you should share a map. You can share a workspace if you want to work on multiple maps and allow your team greater permissions to update and create new maps in the same workspace with you.
Sharing Datasets
You can share datasets from your library. These datasets can then be used by members of your team to create other maps. If you give your team members editing permission, then any edits they make will be reflected in your own dataset and any maps it is used in.
To share a dataset, open the Datasets tab in your library and click on the dataset you wish to share. This will then open the Dataset details window. Then, click the actions dropdown and select the share option to open the Share Dataset window. You can then select Share within team and choose the groups or users that you want to share with.
%20Dataset%20Details%20Actions.png?width=500&height=320&name=(Class%204)%20Dataset%20Details%20Actions.png)
Practical Exercise 3 – Creating a Workspace and Adding Data
Overview – This exercise allows you to put what you learned in Classes 2,3, and 4 into practice.
- Rename your open workspace and Map.
- Rename the sample dataset (or your own dataset) from the Control Panel
- Save any changes that you have made to your map.
- Generate a public link to your map.